
APTORA provides a dedicated Student Scholarship Module to manage scholarship schemes offered by different government departments and other scholarship sources. Institutions can create scholarship schemes by entering scheme details, scholarship amounts, and other required information.
This guide explains how to add a new Scholarship Scheme and view the created scheme in APTORA.
Open the APTORA website and log in using your registered credentials. After successful login, the APTORA Dashboard will be displayed.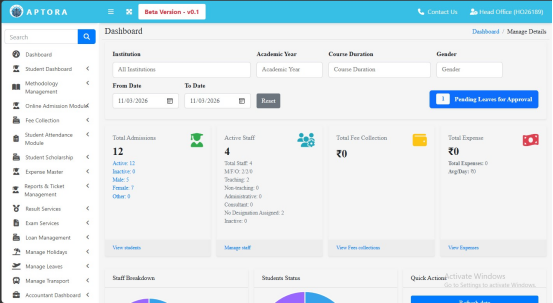
From the left-side navigation menu, locate and click on Student Scholarship to expand the available options.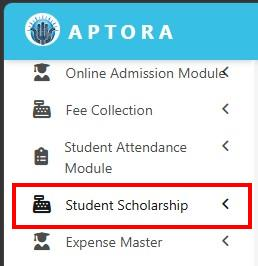
Under the Student Scholarship Module, click on Scholarship Schemes. The Scholarship Scheme List page will be displayed.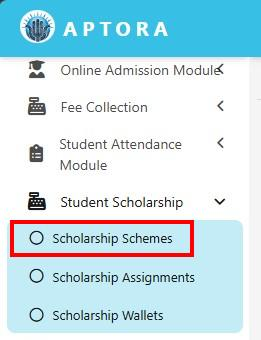
On the Scholarship Scheme List page, click on the Add Scholarship Scheme button available at the top-right corner.
The Add Scholarship Scheme page will be displayed.
Fill in the required information under the Scholarship Scheme Information section.
Scholarship Source: Select the scholarship source from the dropdown list.
Scheme Code: Enter the unique code assigned to the scholarship scheme. The entered code will automatically be converted to uppercase
Scheme Name: Enter the name of the scholarship scheme.
Maximum Amount Per Year (₹): Enter the maximum scholarship amount available per year. This field is optional, and the maximum permitted limit is ₹5,00,000.
Status: Select Active or Inactive based on the scheme's current status.
Remarks: Enter additional information about the scholarship scheme, if required. This field is optional and allows a maximum of 500 characters.
After entering the details, click on the Create Scholarship Scheme button to save the information.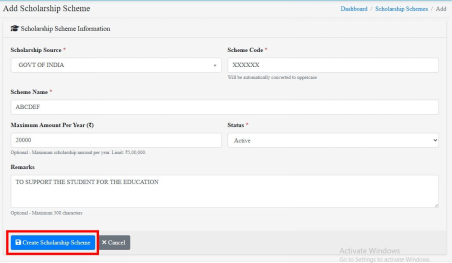
After successfully creating the scholarship scheme, the Scholarship Scheme List will be displayed.
Here, you can view the created scheme along with its Scheme Code, Scheme Name, Scholarship Source, Maximum Amount Per Year, Status, and Last Updated details.
The list also provides options to view, edit, and delete scholarship scheme entries.
You can use the search option to find a particular scheme and filter the records based on All, Active, or Inactive status.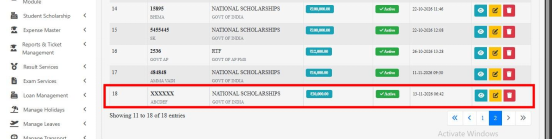
The Scholarship Assignment Management page will be displayed, where administrators can assign scholarship schemes to students and view existing scholarship assignments.
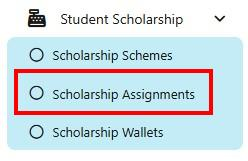
On the Scholarship Assignment Management page, click on the Add Assignment button available at the top-right corner.
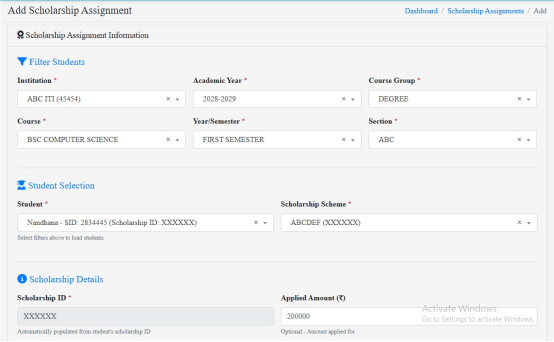
The Add Scholarship Assignment page will be displayed, allowing administrators to select students and enter their scholarship details.
Filter Students:
Institution: Select the institution to which the student belongs.
Academic Year: Select the applicable academic year.
Course Group: Select the student's course group.
Course: Select the course in which the student is enrolled.
Year/Semester: Select the student's current year or semester.
Section: Select the section assigned to the student.
Student Selection:
Student: Select the student to whom the scholarship scheme will be assigned.
Scholarship Scheme: Select the appropriate scholarship scheme from the available list.
Scholarship Details:
Scholarship ID: The scholarship ID will be automatically populated based on the selected student's scholarship information.
Applied Amount (₹): Enter the scholarship amount applied for by the student. This field is optional.
Received Amount (₹): Enter the scholarship amount received by the student. This field is optional.
Status: Select Active or Inactive based on the scholarship assignment status.
Remarks: Enter additional information about the scholarship assignment, if required. This field is optional and allows a maximum of 500 characters.
After entering the required details, click on the Create Scholarship Assignment button to save the information.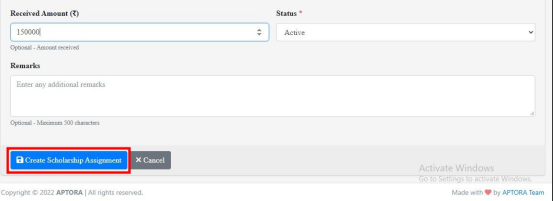
After successfully creating the scholarship assignment, a confirmation message, "Scholarship assignment created successfully," will be displayed.
The Scholarship Assignment List will show the newly created assignment along with the Scholarship ID, Student Details, Scheme Name, Academic Year, Duration, Applied Amount, Received Amount, and Status.
The list also provides options to view and edit scholarship assignment records.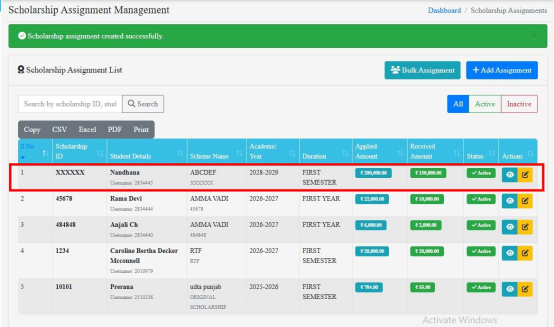
Under the Student Scholarship Module, click on Scholarship Wallets from the left-side navigation menu.
The Scholarship Wallets page will be displayed, providing an overview of scholarship amounts and transactions associated with students.
The dashboard displays the following information:
Total Balance: Displays the combined available scholarship balance across student wallets.
Total Credits: Shows the total scholarship amount credited to student wallets.
Total Debits: Displays the total amount recorded as debits from scholarship wallets.
Active Wallets: Shows the number of active scholarship wallets, along with the number of inactive wallets.
The All Wallets section displays the Student ID, Student Name, Scholarship ID, Scheme, Academic Year, Balance, Total Credits, Total Debits, and Status.
Administrators can search for wallet records using the Student ID or Scholarship ID and filter the records based on wallet status.
The page also provides options to export wallet records in different formats.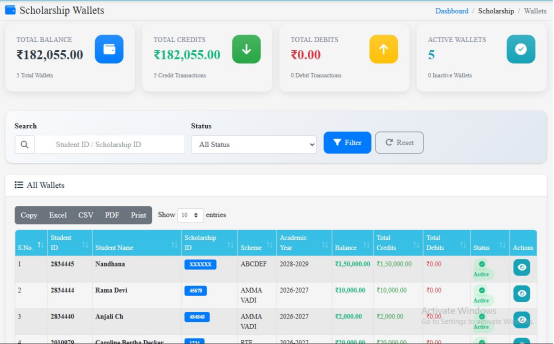
The Student Scholarship Module in APTORA helps educational institutions organize and maintain scholarship-related information through Scholarship Schemes, Scholarship Assignments, and Scholarship Wallets.
The Scholarship Schemes feature allows administrators to create and manage scholarship schemes, while Scholarship Assignments enables institutions to assign these schemes to students and maintain their applied and received scholarship amounts.
Additionally, Scholarship Wallets provides an overview of student scholarship balances, credited amounts, debited amounts, and transaction history.
By using these features, institutions can maintain organized scholarship records, monitor scholarship assignments, and track scholarship-related financial information efficiently in APTORA.